FRIENDSHIP STAR: TUTORIAL PATCHWORK.
Aquesta setmana, Les Antònies, tornem a presentar-vos un tutorial d’un bloc d’estel: la Friendship star.
És un bloc fàcil, ràpid i vistós i es poden fer un munt de variacions. Nosaltres us farem la nostra versió.
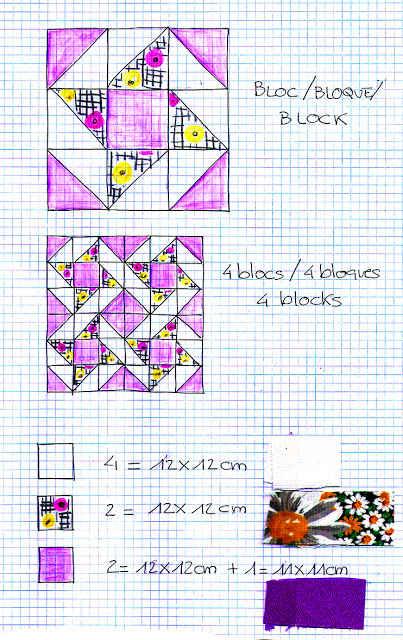
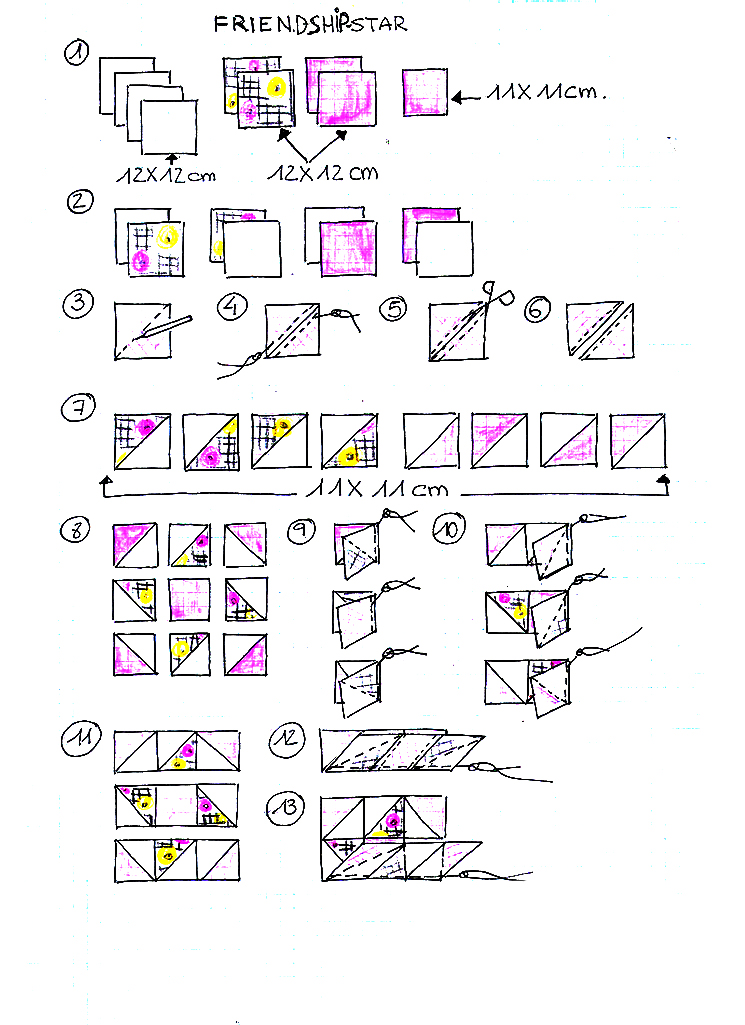
Només hem fet servir tres teixits: 4 quadrats blancs, de piqué, de 12X12cm; 2 quadrats estampats de 12X12cm; 2 quadrats liles de 12X12cm i 1 quadrat d’11X11cm (1). Fem les parelles: 1 quadrat blanc amb cada un dels altres quadrats i deixem a part el quadrat lila petit (2).
Encarem les parelles i darrere d’un dels teixits (millor fer-ho en el més clar), amb llapis, marquem una diagonal (3). Cosim a cada banda de la ratlla dibuixada deixant un marge de 0’5cm, més o menys (4). Tallem per la línia dibuixada, entre les costures (5) i ja tenim dos quadrats amb triangle (6). Ho hem de fer amb totes les parelles, obtenint 8 quadrats d’11X11cm (7).
Continuem col·locant totes les peces per muntar el bloc (8). Fixeu-vos en les quatre centrals: és la composició de la Friendship star. Ja podem començar a cosir com sempre, després de retallar les puntes sobreres i planxar: unim, tira per tira, el primer quadrat amb el central (9); el tercer quadrat amb els dos anteriors (10) per obtenir les tres tires (11), que unirem com és habitual, després de planxar bé les costures: la primera amb la central (12) i la tercera a les dues anteriors (13).
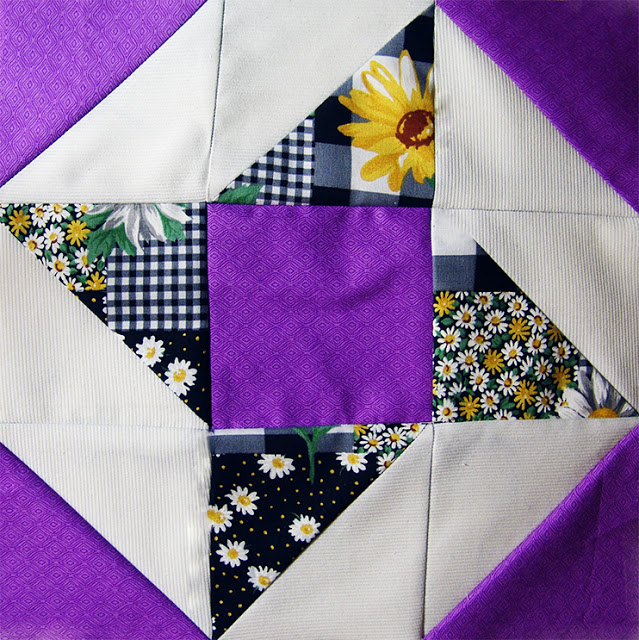
Després de quadrar i planxar, ja tenim el bloc fet, que podeu veure a l’annex. També us hem fet l’esquema de quatre blocsmuntats, per a que veieu l’efecte, més les mesures i quantitat dels teixits.
Ja us hem dit que era un estel molt senzill de fer, per això us animem a que ho proveu i gaudiu de l’amistat d’aquest bloc, igual que nosaltres, dia a dia, compartim i gaudim de la vostra amistat.
UN CANT A L’AMISTAT D’UNA BANDA A L’ALTRA DEL MÓN!!!
FRIENDSHIP STAR: TUTORIAL PATCHWORK.
Esta semana, Les Antònies, volvemos a presentaros un tutorial de un bloque de estrella: la Friendship star.
Es un bloque fácil, rápido y vistoso y se pueden hacer un montón de variaciones. Nosotras os haremos nuestra versión.
Solo hemos usado tres tejidos: 4 cuadrados blancos, de piqué, de 12X12cm; 2 cuadrados estampados de 12X12cm; 2 cuadrados lilas de 12X12cm y 1 cuadrado de 11X11cm (1). Hacemos las parejas: 1 cuadrado blanco con cada uno de los otros cuadrados y dejamos a parte el cuadrado lila pequeño (2).
Encaramos las parejas y detrás de uno de los tejidos (mejor hacerlo en el más claro), con lápiz, marcamos una diagonal (3). Cosemos a cada lado de la ralla dibujada dejando un margen de 0’5cm, más o menos (4). Cortamos por la línea dibujada, entre las costuras (5) y ya tenemos dos cuadrados con triangulo (6). Lo tenemos de hacer con todas les parejas, obteniendo 8 cuadrados de 11X11cm (7).
Continuamos colocando todas las piezas para montar el bloque(8). Fijaos en las cuatro centrales: es la composición de la Friendship star. Ya podemos empezar a coser como siempre, después de recortar las puntas sobreras y planchar: unimos, tira por tira, el primer cuadrado con el central (9); el tercer cuadrado con los dos anteriores (10) para obtener las tres tiras (11), que uniremos como es habitual, después de planchar bien las costuras: la primera con la central (12) y la tercera a les dos anteriores (13).
Después de cuadrar y planchar, ya tenemos el bloque hecho, que podéis ver en el anexo. También os hemos hecho el esquema de cuatro bloques montados, para que veáis el efecto, más las medidas y cantidad de los tejidos.
Ya os hemos dicho que era una estrella muy sencilla de hacer, por esto os animamos a que lo probéis y disfrutéis de la amistad de este bloque, igual que nosotras, día a día, compartimos y disfrutamos de vuestra amistad.
¡¡¡UN CANTO A LA AMISTAD DE UN LADO AL OTRO DEL MUNDO!!!
FRIENDSHIP STAR: PATCHWORK TUTORIAL.
This week, Les Antònies, present you a tutorial of a star block: the Friendship star.
Is an easy, fast and colourful block and you can make a lot of variations. We are going to do our version.
We have only used three fabrics: 4 squares of white piqué, of 12X12cm; 2 print squares of 12X12cm; 2 lilac squares of 12X12cm and 1 lilac square of 11X11cm (1). Do the couples: 1 white square with each one of the other squares and leave aside the small lilac square (2).
Face de couples and behind one of the tissues (best to do it in the lightest), with a pencil, mark a diagonal (3). Sew to each side of the line drawn, leaving a margin of 0‘5 cm, more or less (4). Cut to the line drawn between the seams (5) and we already have two squares with triangle (6). We have to do with all the pairs, obtaining 8 squares of 11X11cm (7).
Continue placing all the parts to assemble the block (8). Note on the four centre pieces: is the composition of the Friendship star. We can already begin to sew as always, after trimming the spare tips and ironing: join, strip by strip, the first square with the central (9); the third square with the above two (10) to obtain the three strips (11), which we will attach as usual, then ironing the seams: the first with the central (12) and the third in the previous two (13).
After fit and iron, we already have the block, which you can see in the annex. Also we have done the drawing of four blocks mounted, to see the effect, plus measures and quantity of tissues.
We have already said that it was a star very easy to do, which is why we encourage you to try it and enjoy the friendship of this block, just like us, day after day, share and enjoy your friendship.
A HYMN TO FRIENDSHIP FROM SIDE TO SIDE OF THE WORLD!!!


