UNA MANERA DIFERENT DE FER UN MOLÍ: TUTORIAL PATCHWORK.
En aquest tutorialLes Antònies no us descobrirem res de nou; només volem compartir amb vosaltres una manera de fer un bloc clàssic, seguint unes passes diferents.
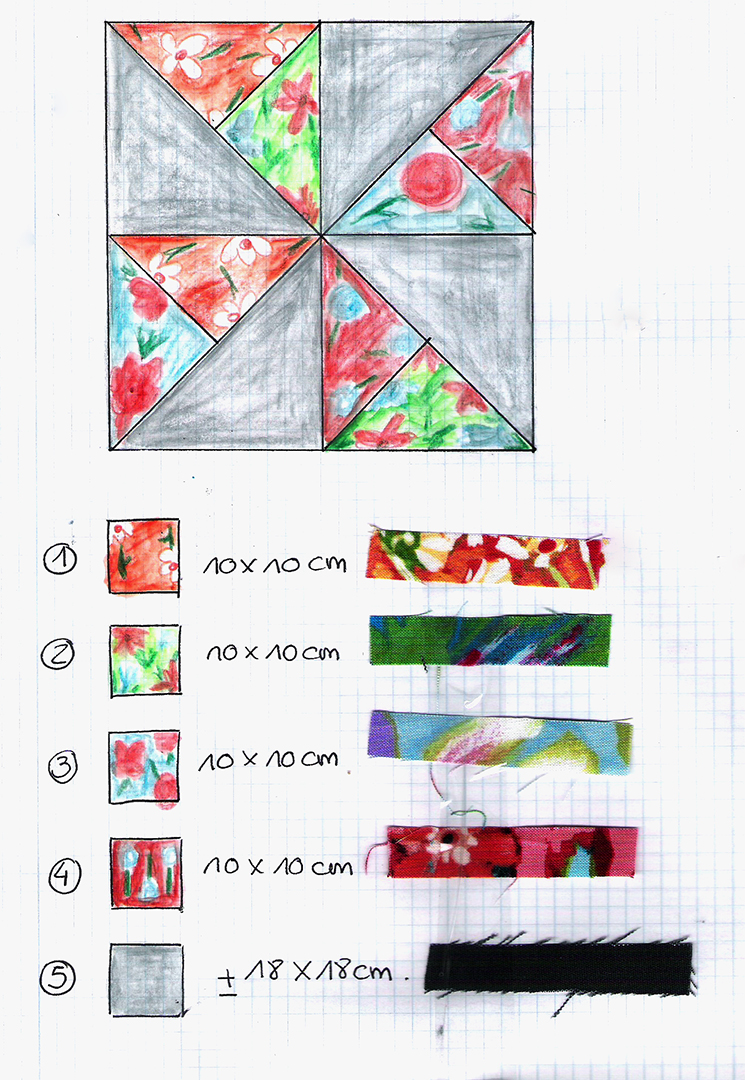
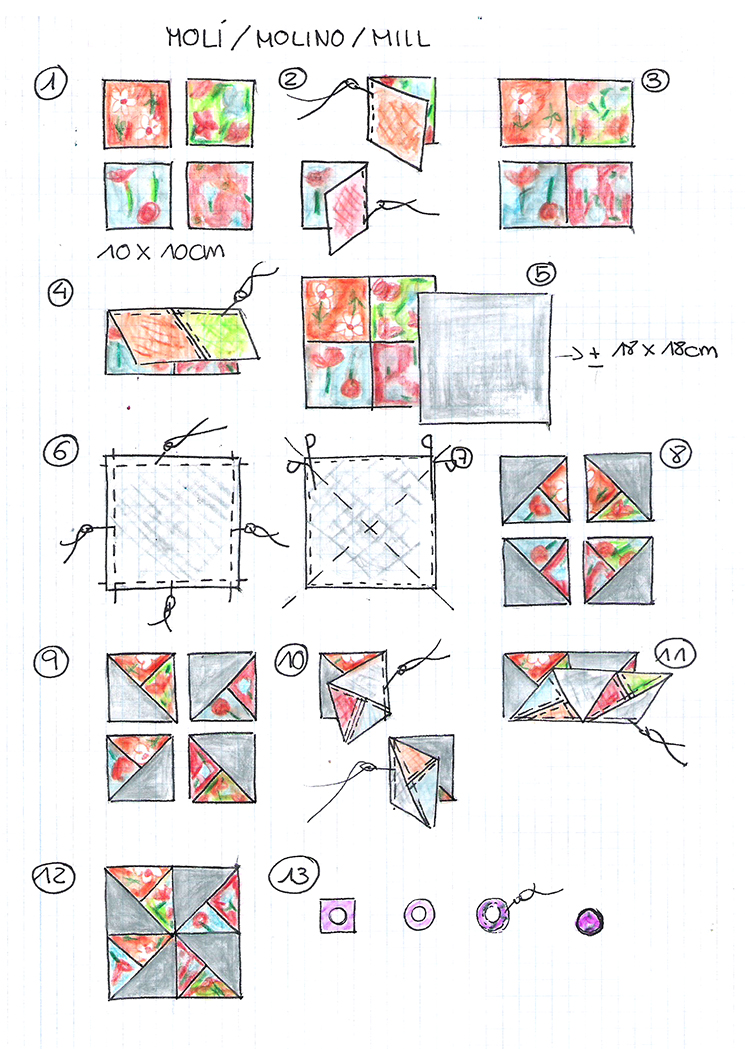
Per fer el nostre molíhem escollit 4 quadrats de 10x10cm de teles diferents (us deixem l’esquema i les mesures) i les hem distribuït fent un quadrat gran (1). Hem cosit els dos quadrats superiors i el dos inferiors (2) obtenint dues tires (3) que hem unit pel centre (4). Una vegada hem planxat i quadrat (si ho necessitem) tallem un quadrat, d’una tela diferent o llisa, de la mateixa mesura del mini-bloc obtingut; en el nostre cas de 18X18cm (5).
Comencem la segona part del procés encarant el quadrat llis amb el mini-bloc i cosim per els quatre costats (6). Marquem en forma de creu aspada, dues diagonals i tallem seguint les línies (7). Obrim, planxem i hem obtingut 4 mini-blocs amb triangle doble (8). Els distribuïm formant un molí (9) i seguim el procediment d’unir les peces: cosim els dos quadrats superiors i els dos quadrats inferiors entre ells (10); cosim les dues tires obtingudes pel centre (11) i després de planxar i quadrar si és necessari, ja tenim el blocacabat.
El centre el podeu guarnir amb un botó o, com nosaltres hem fet, amb un petit cercle de tela: fem una rodona de cartró; la situem al centre d’un retall de tela; arrodonim aquest retall; cosim per darrere donant forma i traíem el cartró (13). Ja podem aplicar-lo al centre del nostre bloc.
Aquesta és una tècnica diferent per obtenir un resultat més original, donant un gir nou a un blocclàssic.
DIFERENT TÈCNICA; MOLÍ NOU!!!
UNA MANERA DIFERENTE DE HACER UN MOLINO: TUTORIAL PATCHWORK.
En este tutorial Les Antònies no os descubriremos nada nuevo; solo queremos compartir con vosotr@s una manera de hacer un bloque clásico, siguiendo unos pasos diferentes.
Para hacer nuestro molino hemos escogido 4 cuadrados de 10x10cm de telas diferentes (os dejamos el esquema y las medidas) y las hemos distribuido haciendo un cuadrado grande (1). Hemos cosido los dos cuadrados superiores y los dos inferiores (2) obteniendo dos tiras (3) que hemos unido por el centro (4). Una vez hemos planchado y cuadrado (si lo necesitamos) cortamos un cuadrado, de una tela diferente o lisa, de la misma medida del mini-bloque obtenido; en nuestro caso de 18X18cm (5).
Comenzamos la segunda parte del proceso encarando el cuadrado liso con el mini-bloque y cosemos por los cuatro lados (6). Marcamos en forma de cruz aspada, dos diagonales y cortamos siguiendo las líneas (7). Abrimos, planchamos y hemos obtenido 4 mini-bloques con triángulo doble (8). Los distribuimos formando un molino(9) y seguimos el procedimiento de unir las piezas: cosemos los dos cuadrados superiores y los dos cuadrados inferiores entre ellos (10); cosemos las dos tiras obtenidas por el centro (11) y después de planchar y cuadrar si es necesario, ya tenemos el bloque acabado.
El centro lo podéis adornar con un botón o, como nosotras hemos hecho, con un pequeño círculo de tela: hacemos un redondel de cartón; la situamos en el centro de un retal de tela; redondeamos este retal; cosemos por detrás dando forma y sacamos el cartón (13). Ya podemos aplicarlo al centro de nuestro bloque.
Esta es una técnica diferente para obtener un resultado más original, dando un giro nuevo a un bloque clásico.
¡¡¡DIFERENTE TÉCNICA; MOLINO NUEVO!!!
A DIFFERENT WAY TO DO A WINDMILL: PATCHWORK TUTORIAL.
In this tutorial Les Antònies will not discover you anything new; we just want to share with you a way to make a classic block, following a few different steps.
To make our mill we have chosen 4 10x10cm squares of different fabrics (we leave the scheme and measures) and we have distributed by a large square (1). We have sewn the two squares above and two below (2) obtaining two strips (3) that we united it by the centre (4). Once we have ironing and trimming (if you need) cut a square of a different print or smooth fabric, the same size of the mini-blockretrieved; in our case of 18X18cm (5).
We begin the second part of the process facing the smooth square with the mini-block and sew by the four sides (6). Mark a cross of two diagonals and cut along the lines (7). Open, ironing and we have obtained 4 mini-blockswith dual triangle (8). We distributed forming a mill (9) and follow the procedure to join the pieces: sew the two upper squares and two lower squares between them (10); sew two strips obtained by the centre (11) and after ironing and fit if it is necessary, we already have the block finished.
The centre you can decorate it with a button or, as we have done, with a small circle of fabric: make a ring of cardboard; placed in the centre of a scrap of fabric; we round up this scrap; we sew from behind giving shape and remove carton (13). We can apply it to the middle of our block.
This is a different technique to obtain a result more original, giving a new twist to a classic block.


