tutorial: broche molinilllo de viento con fieltro / tutorial: felted pinwheel pins
¿Buscas un proyecto fácil y rápido para hacer? Te propongo que hagas estos broches de molinillos de viento con fieltro. Los podéis utilizar en vuestros proyectos de scrapbooking, son un original complemento para vuestra ropa e incluso podéis haceros un bonitos collar con ellos. ¿Os animáis?
………………………………………..
Looking for some quick and easy DIY? I propose to you to make these pretty felted pinwheel pins. You can use them in your scrapbooking projects, as an original accessory for clothes or even make a beautiful necklace with them. Do you want to try?
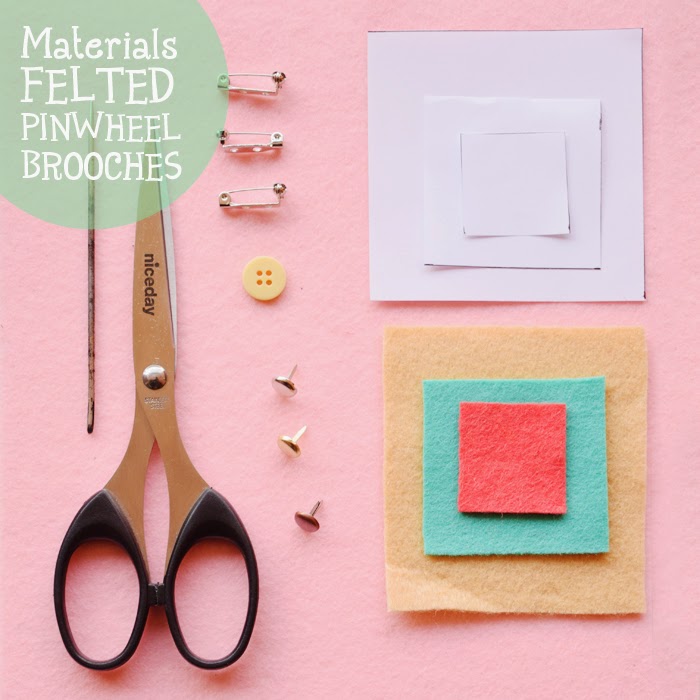
TAN SÓLO NECESITÁIS
– Tijeras
– Aguja lanera
– Fieltro de colores
– Patrones de papel de cuadrados (3x3cm, 5x5cm y 8x8cm)
– Un botón
– Brads
– Pistola de pegamento caliente
– Base para broche
– Lápiz para marcar ropa
………………………………………..
YOU ONLY NEED
– Scissors
– Wool needle
– Colorful felt
– Paper square patterns (3x3cm, 5x5cm and 8x8cm)
– Button
– Brads
– Hot glue
– Pin base
– Dressmaker pencil
HACIENDO EL MOLINETE
1-2. Utiliza los patrones de papel para recortar diferentes cuadrados de fieltro.
3-4. Entonces, coloca el botón en el centro del cuadrado de fieltro y dibuja las líneas diagonales desde el centro hasta las esquinas con el lápiz para marcar la ropa.
5-6. Corta por las marcas sin llegar al centro del cuadrado, como en la foto 6.
………………………………………..
MAKING A PINWHEEL
1-2. Use the paper patterns to cut out different squares of felt.
3-4. Then, place the button on the middle of the felted square and draw diagonal lines from the center to the corners with a dressmaker pencil.
5-6. Cut your marks without arrive at the center of the square, such in the photo 6.
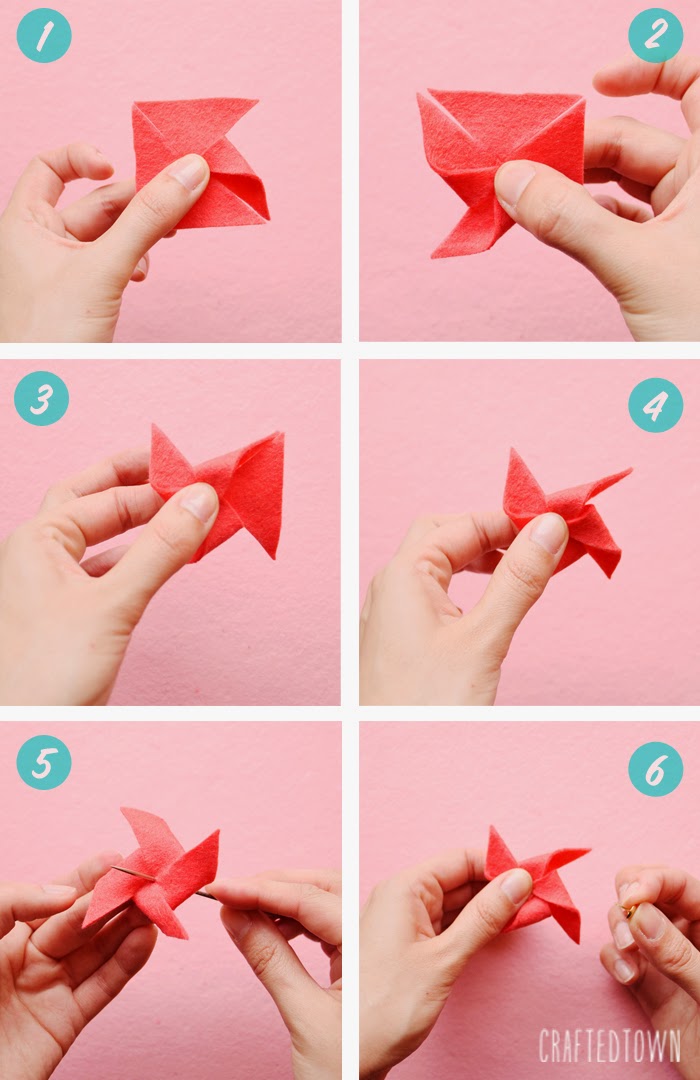
DOBLANDO LAS ASPAS DEL MOLINETE
1-4. Dobla las esquinas que habéis cortado hacia el centro, como en las fotos.
5-6. Ahora con la aguja de lana mientras sujetáis los extremos en el centro, tenéis que atravesar la pieza de fieltro. Sigue sujetando los extremos en el centro y con un brad únelos todos juntos a través del agujero que habréis hecho con la aguja.
Repetir el proceso con los otros cuadrados de fieltro.
………………………………………..
FOLDING THE BLADES OF THE PINWHEEL
1-4. Fold the corners you had cut out to the center, like in the photos.
5-6. Now with the wool needle whilst you are holding the felted corners in the center, poke with it untill you run through the felt. Continue tightening all the corners and use a brad to join them together throught the hole you had made with the needle.
Repeat the process with the other felted squares.
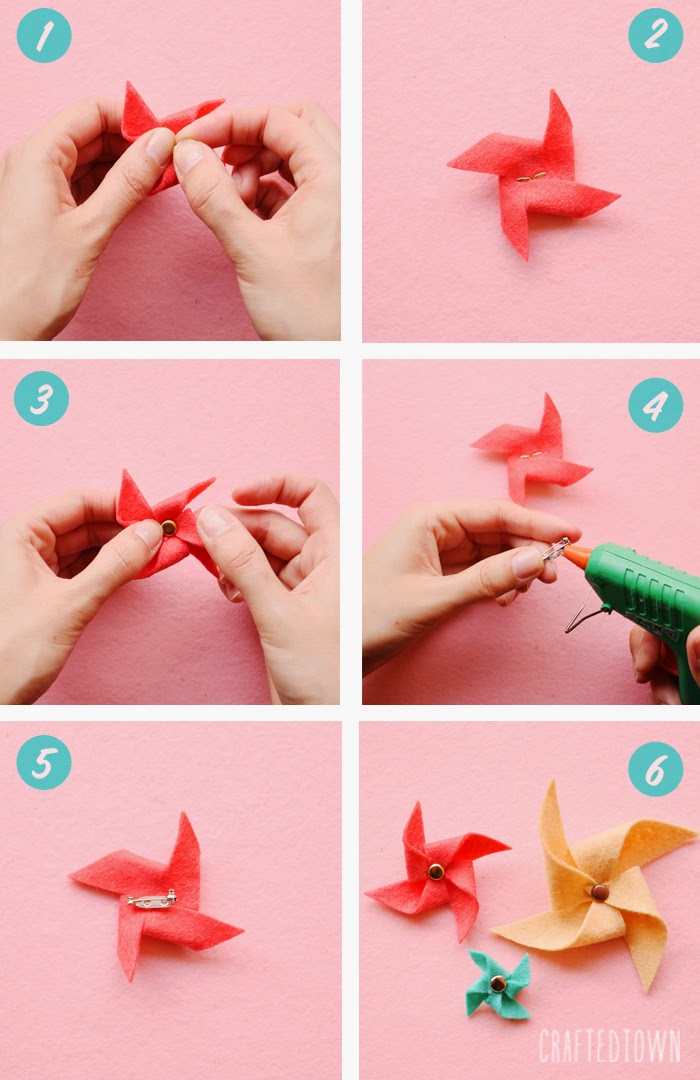
REMATANDO EL BROCHE
1-3. Dobla las patitas del brad para apretar bien el molinete. En este paso estaría listo para que lo utilizáseis en vuestros projectos de scrapbooking.
4-5. Si queréis hacer el broche, utilizar la pistola de pegamento para pegar la base del broche con el molinete de fieltro que habéis hecho y listo. Si preferiís hacer el collar, tan sólo tenéis que cortar la cadena a vuestra medida, ponerle cierres y con una pequeña anilla unir el molinete de fieltro a ella y lo tendréis listo para lucir.
………..………………………………
FINISHING THE PIN
1-3. Fold the little legs of the brad to tighten the pinwheel. Now is ready to be used for your scrapbooking projects.
4-5. If you want to make a pin use the hot glue to stick the pin base with your felted pinwheel and it’s ready. If you would like to make a necklace, just cut out to measure a chain and put a clasp, then with a little ring join the felted pinwheel and it will be finished to wear.
Si os animáis hacer algun molinillo dejar el link en los comentarios, me encantará ver vuestras creaciones.
Feliz fin de semana.
………………………………………..
If you make some pinwheels please share with us in the comments, I would like to see your creations.
Have a nice weekend.
Visita la entrada original AQUÍ


