FLYING GEESE: EL NOU TUTORIAL DE PATCHWORK.
Les Antònies, últimament, estem una mica voladores. El bloc (o mini-bloc) d’aquesta setmana es diu Flying Geese; es a dir, Oques volant. Ja veureu que és molt fàcil i el resultat pot arribar a ser molt vistós.
Nosaltres us explicarem com es fa el mini-bloc i us ensenyarem el blocque nosaltres hem fet. Vosaltres podeu combinar i fer tots els que vulgueu perquè la gracia d’aquest bloc està en el gust del qui el fa.
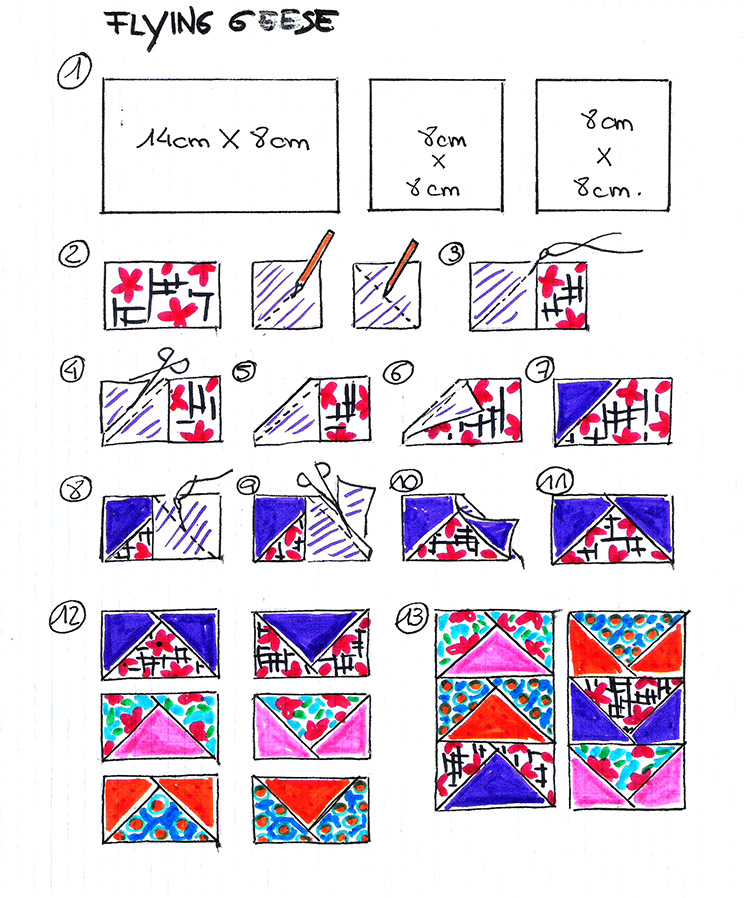
Les mesures que nosaltres hem fet servir per cada Flying Geese són: un rectangle de 14cmX8cm i dos quadrats de 8cmX8cm (1). Fixeu-vos que, si voleu canviar les mesures del mini-bloc, els quadrats han de ser iguals a l’amplada del rectangle.
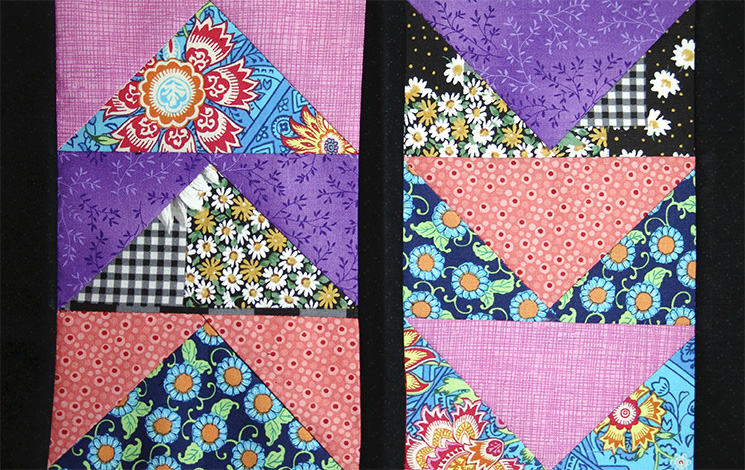
El primer què hem de fer és marcar amb un llapis una línia diagonal als quadrats (2); serà nostra guia per cosir. Col·loquem, encarat, el primer quadrat damunt del rectangle, de manera que la línia que hem dibuixat vagi del centre a l’extrem i cosim damunt d’aquesta línia (3). Una vegada cosit, marquem, per damunt de la costura, una altra línia, deixant un marge (de 0,5cm a 1cm), i retallem les dues teles (4). Una vegada retallat, ens ha de quedar com la figura (5); obrim (6), planxem i aquest és el resultat (7). Ara farem el mateix amb el 2º quadrat: cosim (8), retallem (9) obrim i planxem (10). Ja tenim el mini-bloc acabat (11). Nosaltres hem fet 6 Flying Geese (12) i els hem cosit fent dues franges (13). Per completar el bloc, hem cosit tres tires en color negre, una al mig de les franges i dues a cada banda.
Després de veure moltes maneres de fer aquest mini-bloc, el tutorial més aclaridor i que més ens va agradar va ser el de 3and3quarters; us deixem l’enllaç de YouTube.Esperem que el nostre tutorial sigui el complement perfecte.
COM LES OQUES, VOLEM EN FORMACIÓ!!!
FLYING GEESE: EL NUEVO TUTORIAL DE PATCHWORK.
Les Antònies, últimamente, estamos una poco voladoras. El bloque (o mini-bloque) de esta semana se llama Flying Geese; es decir, Ocas volando. Ya veréis que es muy fácil y el resultado puede llegar a ser muy vistoso.
Nosotras os explicaremos como hacer el mini-bloque y os enseñaremos el bloque que hemos hecho. Vosotr@s podéis combinar y hacer todos los que queráis porque la gracia de este bloque esta en el gusto de quien lo hace.
Las medidas que hemos usado para cada Flying Geese son: un rectángulo de 14cmX8cm y dos cuadrados de 8cmX8cm (1). Fijaos que, si queréis cambiar las medidas del mini-bloque, los cuadrados han de ser iguales a la anchura del rectángulo.
Lo primero qué tenemos que hacer es marcar con un lápiz una línea diagonal en los cuadrados (2); será nuestra guía para coser. Colocamos, encarado, el primer cuadrado sobre el rectángulo, de manera que la línea que hemos dibujado vaya del centro al extremo y cosemos sobre esta línea (3). Una vez cosido, marcamos, por encima de la costura, otra línea, dejando un margen (de 0,5cm a 1cm), y recortamos las dos telas (4). Una vez recortado, nos ha de quedar como la figura (5); abrimos (6), planchamos y este es el resultado (7). Ahora haremos lo mismo con el 2º cuadrado: cosemos (8), recortamos (9) abrimos y planchamos (10). Ya tenemos el mini-bloque acabado (11). Nosotras hemos hecho 6 Flying Geese (12) y los hemos cosido haciendo dos franjas (13). Para completar el bloque, hemos cosido tres tiras en color negro, una en medio de las franjas y dos a cada lado.
Después de ver muchas maneras de hacer este mini-bloque, el tutorial más claro y que más nos gusto fue el de 3and3quarters; os dejamos elenlace de YouTube. Esperamos que nuestro tutorial sea el complemento perfecto.
¡¡¡COMO LAS OCAS, VOLAMOS EN FORMACIÓN!!!
FLYING GEESE: PATCHWORK’S NEW TUTORIAL.
Les Antònies, lately, are flying a little. The block(or mini- block) this week is called Flying Geese. As you will see that it is very easy and the result can be quite showy.
We will tell you how to make the mini-blockand we will show the block that we have done. You can combine and make all you want because the funny trick of this block is in the taste of who makes it.
The measures that we have used for each Flying Geese are: a rectangle of 14cmX8cm and two squares of 8cmX8cm (1). Note that, if you want to change the measurements of the mini-block, the squares should be equal to the width of the rectangle.
The first what we have to do is mark with a pencil a diagonal line to the squares (2); it will be our guide to sew. Place, faced, the first square on top of the rectangle, so that the line that we have outlined go from the centre to the edge and sew on this line (3). Once sewn, mark, above the seam, another line, leaving a margin (from 0,5cm to 1cm), and cut the two fabrics (4). Once cut, we should stay as the figure (5); open (6), ironing and this is the result (7). Now do the same with the 2nd square: sew (8), cut (9) open and iron (10). We already have the mini-block finish (11). We made 6 Flying Geese (12) and we have sewn by two bands (13). To complete the block, we have sewn three strips in black, one in the middle of the bands and two on each side.
After seeing so many ways to do this mini-block, the tutorial more enlightening and that we liked was that of 3and3quarters;take a look at the YouTube link. We hope that our tutorial is its perfect complement.
AS GEESE, WE ARE IN TRAINING!!!


