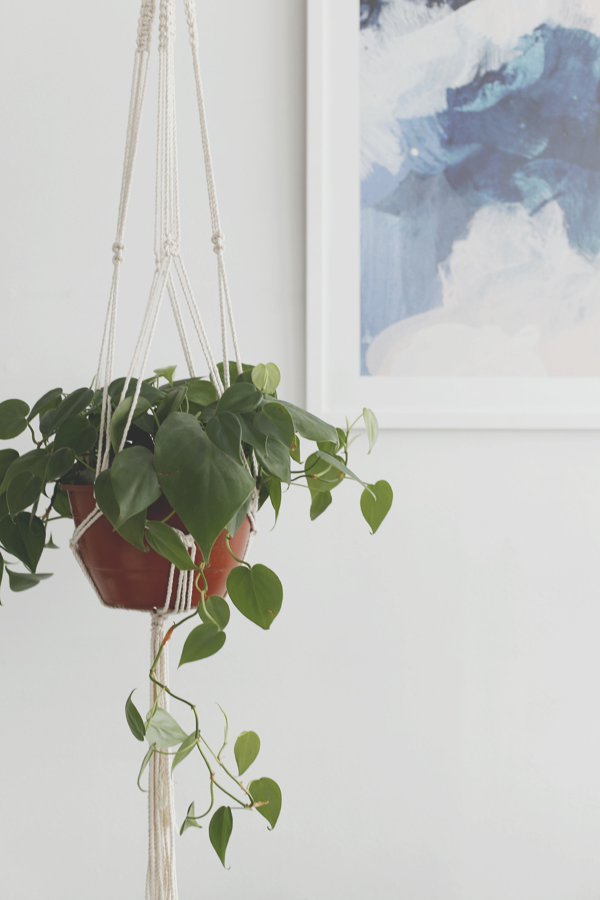
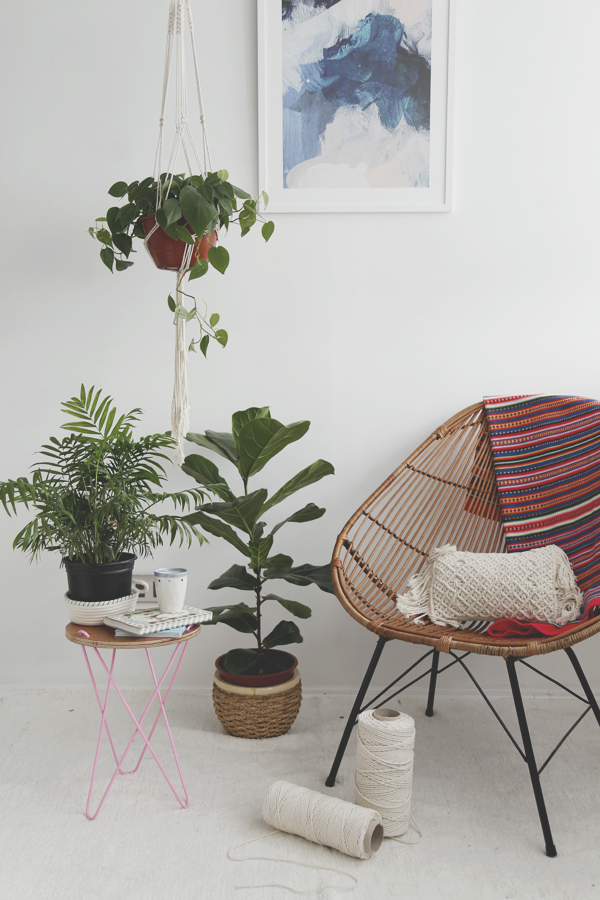
Colgante de macramé para principiantes (usando sólo un nudo)
Hola! Cony por acá. Antes de comenzar con este post, les quiero contar que hoy se suma al equipo de LVEC, Carla, artista y creadora de Filodendro, proyecto dedicado al trabajo en macramé. Junto a ella estaremos creando nuevos DIY para aprender más sobre esta linda y tradicional técnica de los nudos. ¿Qué les parece? Así que sin más rodeos (y tal como sería una presentación en televisión), los dejo con Carla! 
Les contaré que tengo varias obsesiones, y una de ellas son las plantas. Voy al vivero con mi hijo por lo menos dos veces al mes. El llegar a casa con una una nueva integrante es hermoso, ver cómo crecen y conocerlas es tan terapéutico como cualquier cosa a la que le dediquemos amor y preocupación.
Pero hoy no vengo enseñar de plantas sino de su complemento perfecto: el macramé. Este verdadero arte de los nudos se ha robado las miradas de muchos, y no sólo hoy: muchos lo recordarán de la casa de la abuela, o de esa tía de Talca.
El objetivo de este proyecto es darle el espacio que las plantas colgantes necesitan para que luzcan hermosas, además de adornar rincones vacios de nuestro hogar.
El diseño es muy simple y lo haremos con un solo tipo de nudo. Si bien tiene varios nombres, nosotros lo reconoceremos como nudo plano (NP), aunque también se le llama nudo cuadrado o nudo cruz.
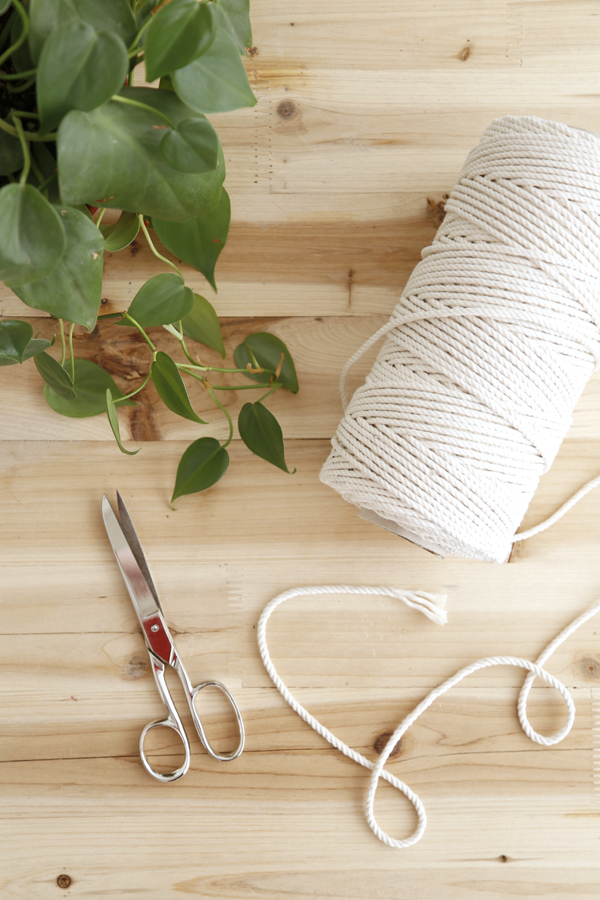
Materiales:
- Cordón de algodón torcido de 3 mm (o yute o trapillo)
- Tijeras
- Huincha de medir
- Soporte como clavo en la pared
• • •
Macramé hanger for beginners (using just one knot)
Let me tell you I have various obsessions, and one of those is plants. I go to the plant nursery with my son at least two times a month. Arriving home with a new member of the household is beautiful, to see how they grow and to get to know them as therapeutic as any other thing to which we dedicate love and care.
But today I’m not here to teach you about plants rather about a perfect accompaniment: macramé. This true art of knots has attracted many people and not just today: Many of us will remember it from our grandmother’s houses, or that aunt from Talca.
The aim of this project is to create a space that hanging plants need so they can look beautiful, as well as decorating empty spaces in our home.
The design is very simple and we’ll do this with just one type of knot. Although it might have many names, we will call it the flat knot (FK), but it can also be called a square knot or a crossed knot.
Materials:
- 3 mm diameter twisted cotton cord. (Or jute)
- Scissors
- Measuring tape
- Support, like a nail fixed in the wall
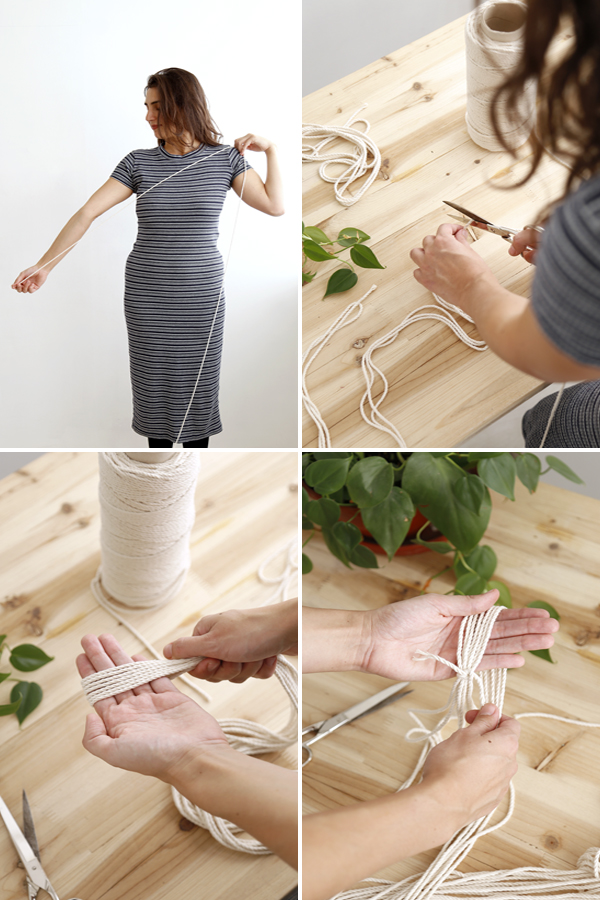
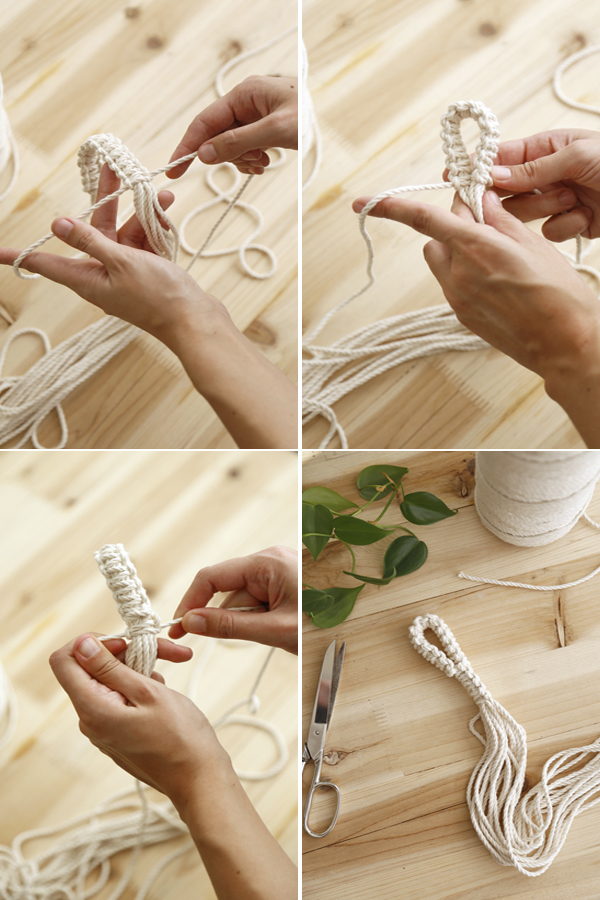
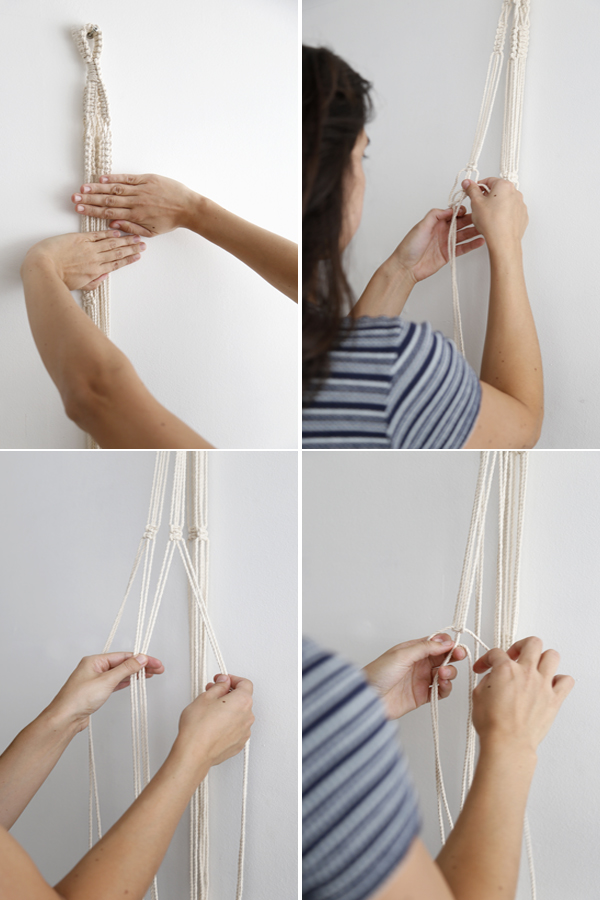
1.- Corta 7 cuerdas de 3 mts de largo y una de 5 mts. Puedes ayudarte con el largo de tus brazos o con una huincha.
2.- Junta las 7 cuerdas de 3 metros, ubica el centro y pásalas por los dedos de tu mano (ese será el espacio donde irá colgado) Marca con un pedazo de cordón, ya que ese será el inicio de tu trabajo.
• • •
1.- Cut seven 3-metre lengths of thread and one length of 5 m. You can just use your arm-span to measure this, or a measuring tape.
2.- Join your seven 3-metre lengths, find the middle point and double this over your hand (this is the point from which your work will hang) mark this point by knotting a small length of cotton around the strands, and this will be the starting place for your work.
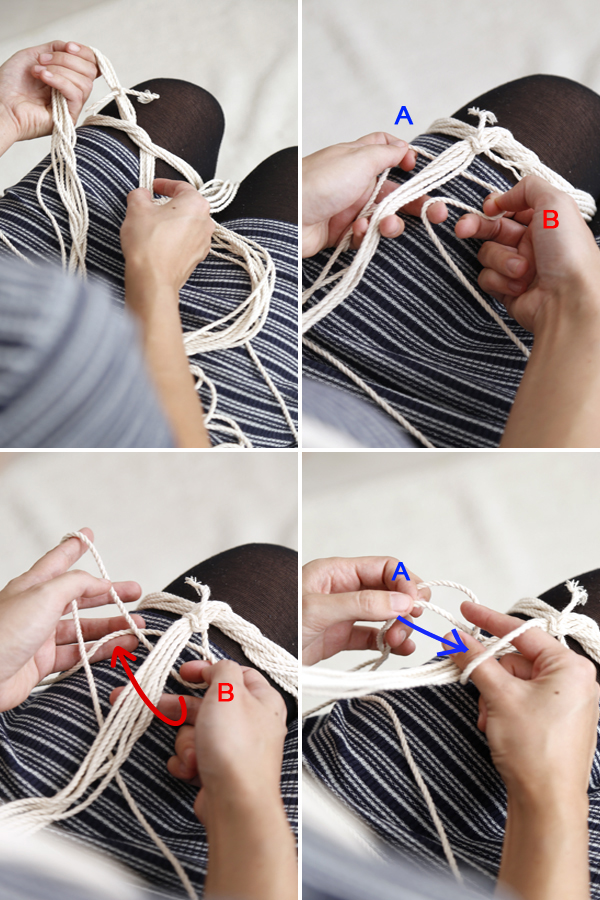
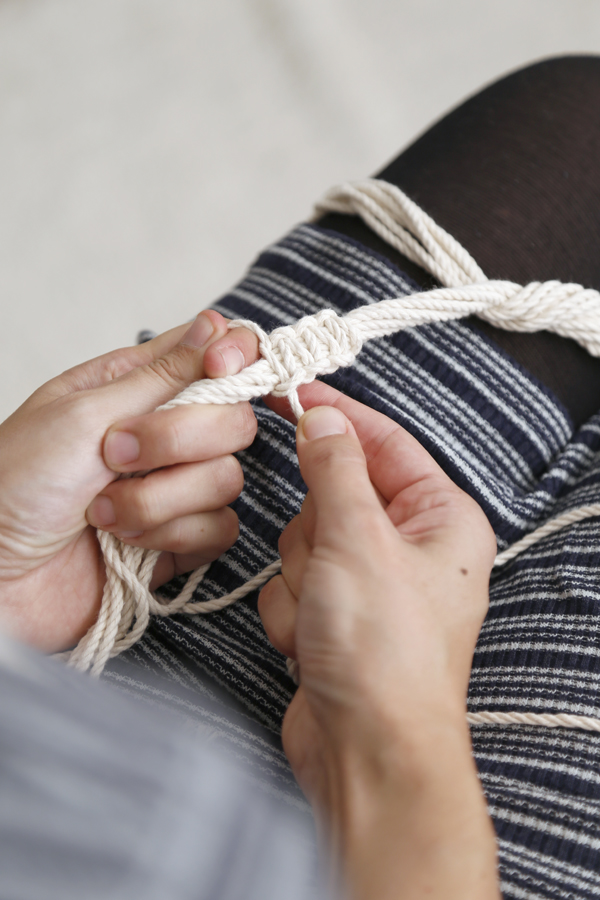
3.- Usa tu pierna como base de apoyo, amarra las 7 cuerdas y comienza a anudar desde la marca.
En esta fase, los cordones que tenemos amarrados a la pierna serán de guía, es decir, quedarán en el centro del tejido y ocuparemos el octavo cordón que mide 5mts para tejer (es más largo porque se irá consumiendo a medida que anudamos).
4.- Pasa el cordón largo por debajo de los otros 7. A la parte que quedó a tu izquierda, la llamaremos A, mientras que a la derecha B (ver foto).
5.- Pasa B hacia la izquierda por debajo de los cordones guías, procurando no tirar demasiado para dejar un agujero.
6.- Pasa B por encima de A.
7.- Pasa A por entremedio de espacio que dejamos, y aprieta.
• • •
3.- Using your leg as a support, tie the seven chords and begin knotting from your start place.
In this phase the threads that we have wrapped around the leg will be the guide, that is to say they will remain at the centre of the knit, and we will use the eighth cord that measures 5 m to knit around this (it is longer because it will get shorter as we create the knots)
4.- Pass the long cord underneath the other seven. The end that remains on your left we’ll call A, and the part on your right, B. (See photo)
5.- Pass B to the left, passing underneath the guide cords, taking care not to make this too tight leaving a small opening.
6.- Pass B over A.
7.- Pass A through the space that we left and pull tight.
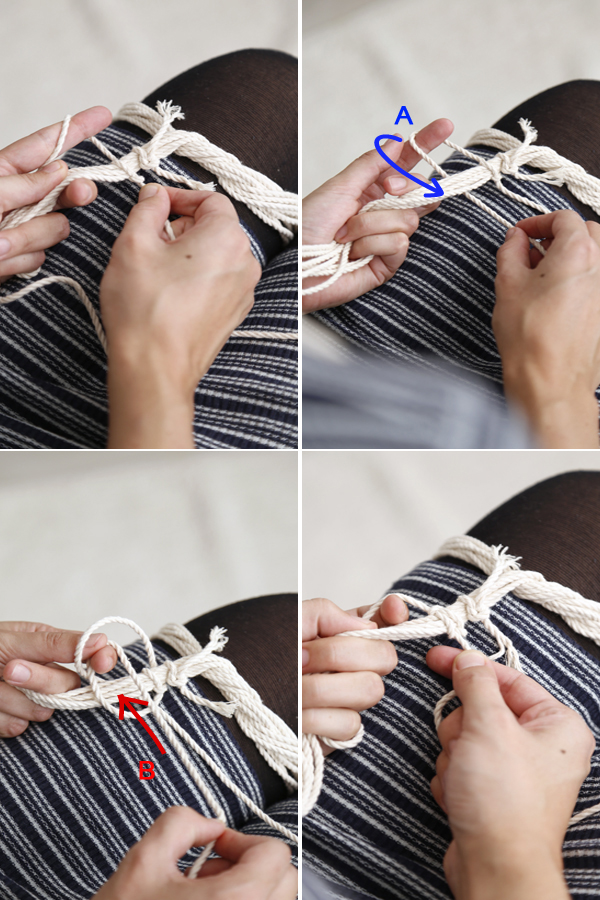
8.- Repite lo mismo hacia el otro lado: Pasa A hacia la derecha, por debajo de las guías y por encima de B. Pasa B por el agujero y aprieta. Ahí ya tienes un nudo plano completo.
• • •
Repeat this step on the other side: pass A to the right, passing underneath the guide cords and over then B. Pass B up through the opening and pull tight.
9.- Haz entre 10 y 15 nudos.
• • •
9.- Repeat the steps, making 10 to 15 knots.
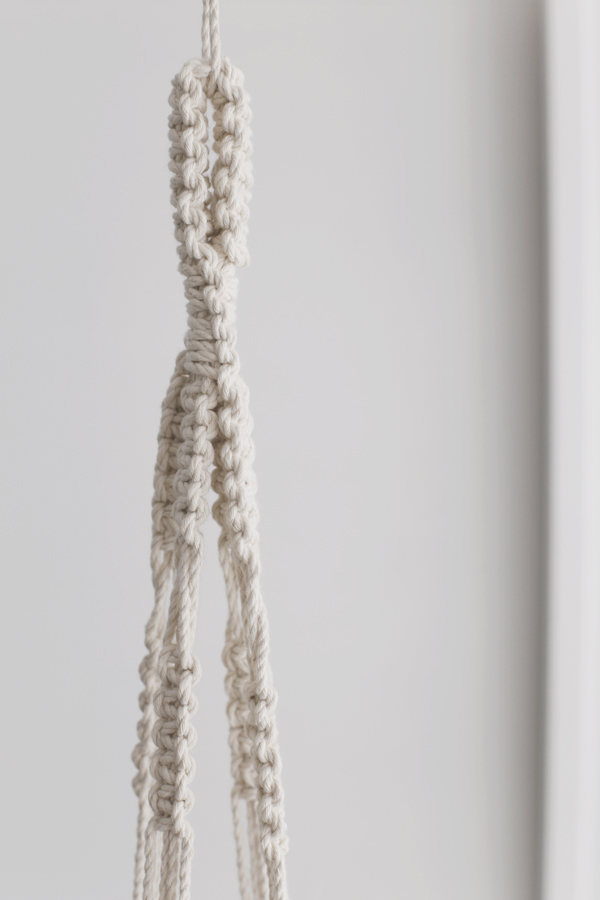
10.- Una vez listos, junta todos los cordones y únelos con 5 nuevos nudos planos. Con esto, habrás formado el orificio para afirmar tu colgante.
• • •
10.- Once that is done, Bring the two ends together and tie them with five new flat knots. With this, you have created the hanging point for your pendant.
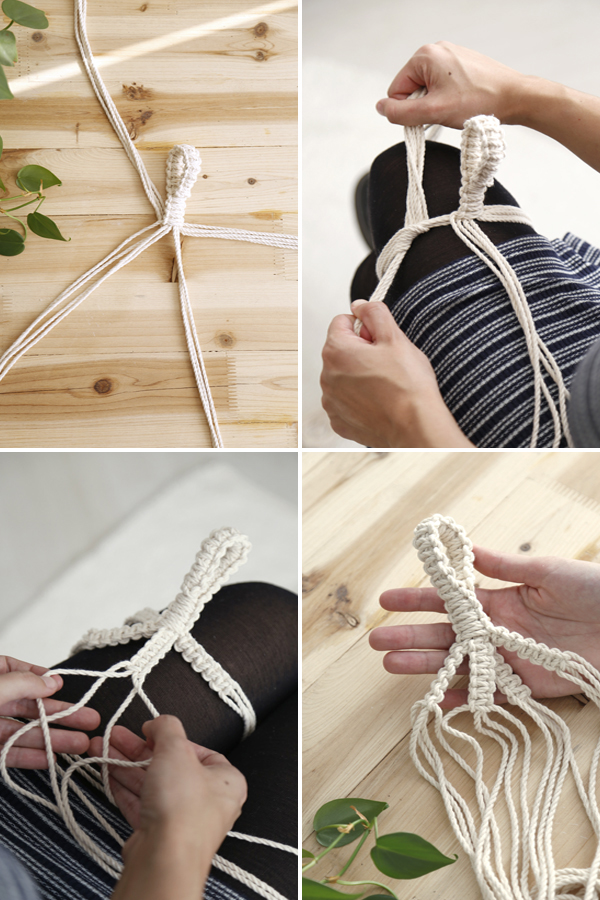
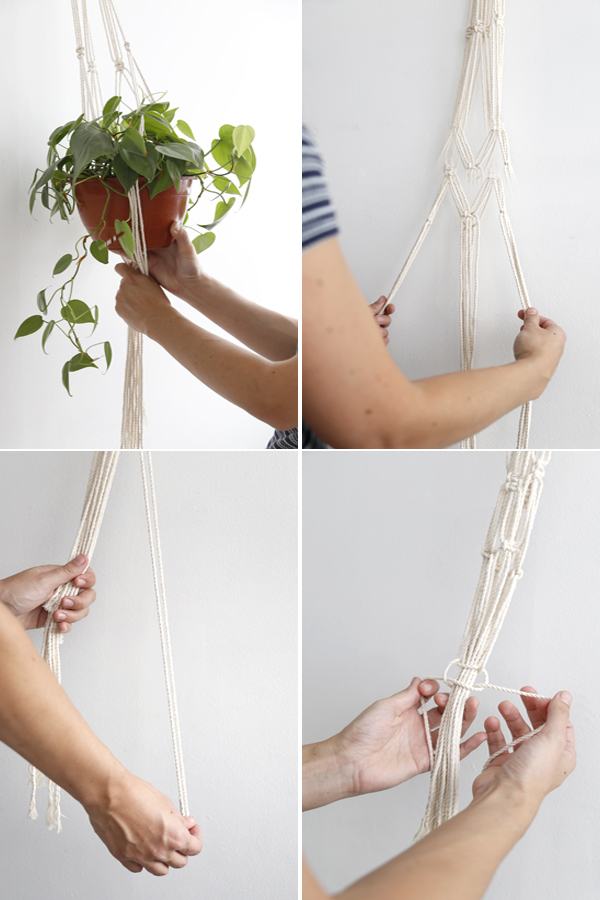
11.- Separa 4 grupos con 4 cordones cada uno.
12.- Amarra 3 grupos a tu pierna y comienza a anudar el cuarto.
13.- Haz 5 NP en cada grupo.
• • •
11.- Separate the threads into 4 groups of 4 threads.
12.- Tie three groups to your leg and start knotting the fourth.
13.- Do five FKs on each group.
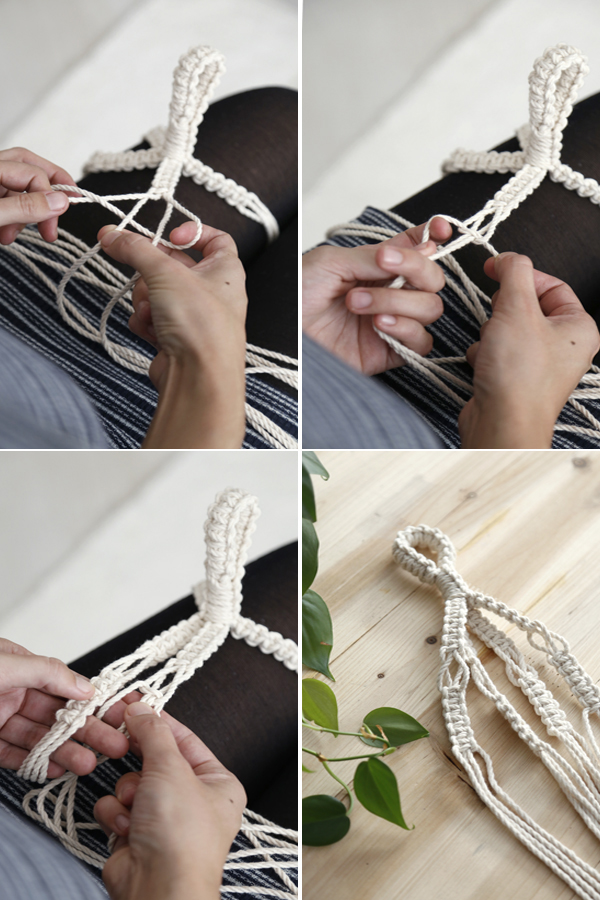
14.- Como los cordones externos se han ido consumiendo y queremos que todos lleguen relativamente parejos hasta el final, pasaremos los cordones guías hacia el exterior y los del exterior hacia el centro como guías.
15.- Deja un espacio sin nudos, en este caso fueron dos dedos aprox.
16.- Continúa con 5 NP en cada grupo, procurando que todos queden a la misma altura.
• • •
14.- As the external threads will have become progressively shorter and we want them to be relatively equal when we finish, we will pass the guide cords to the outside and the exterior towards to the centre as a guide.
15.- Leave a space with no knots, in this case it was approximately a double finger space.
16.- Continue with another five FKs in each group, trying to make them all at the same level.
17.- Desde aquí, te recomiendo que uses un clavo para colgar tu trabajo.
18.- Deja nuevamente un espacio, en este caso fueron dos palmas.
19.- Haz 1 NP en cada tira
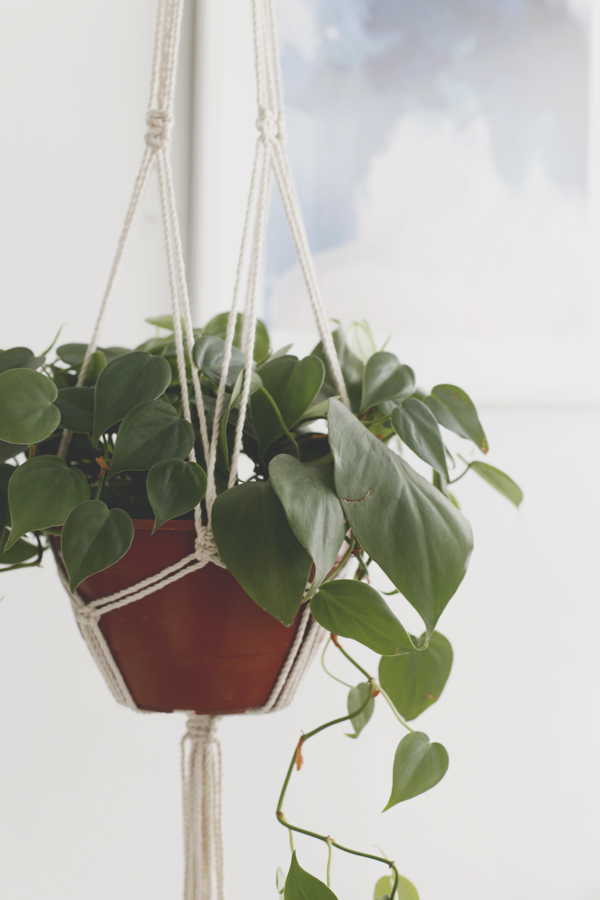
20.- Mide nuevamente dos palmas hacia abajo. Separa y mezcla los cordones, dos de un grupo y dos de otro, tal como muestra la foto.
21.- Haz 1 NP en cada nuevo grupo.
• • •
17.- From this point I recommend using a nail to hang your work.
18.- Again leave a space, this case it was about to hand widths.
19.- Do you one FK on each group
20.- Measure another hand length lower down. Separate and cross over threads two from one group with two from the adjacent. (See photos)
21.- Do one more FK in each new group.
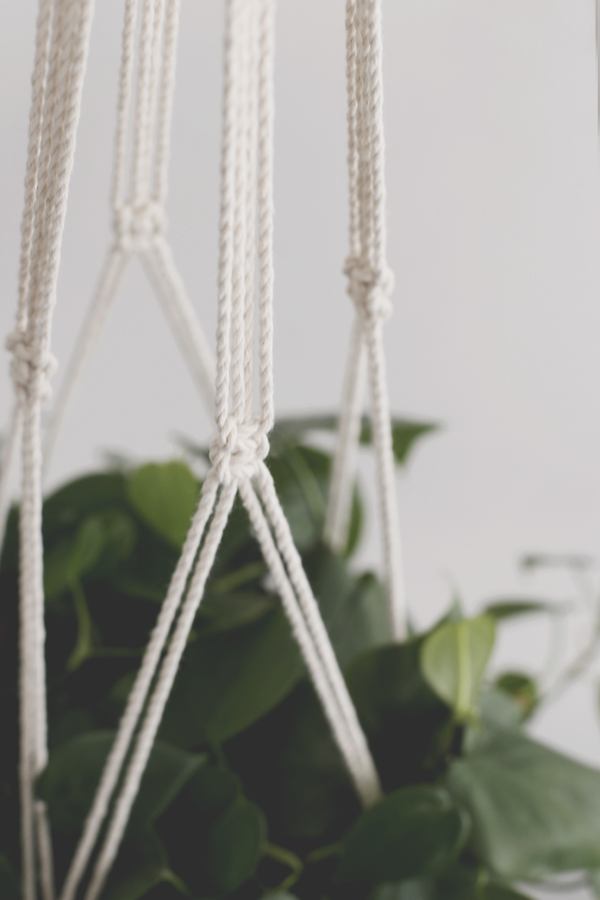
22.- Usa el macetero que colgarás para fijar la posición el próximo NP
23.- Vuelve a separar y mezclar los cordones (paso 22). Haz 1 NP en cada nuevo grupo.
24.- Para el cierre y la base que afirmará el macetero, junta los dos cordones más largos para usarlos como abrazadores de guías. Haz dos o tres NP para finalizar.
• • •
22.- Use the plant pot that you’ll be hanging to judge the position of the next FK.
23.- Repeat step 20, crossing over threads. Do one more FK in each new group.
24.- To close this and create a base that will hold the plant pot, join the two longest threads, and use these to tie off the strands. Do two or three FKs to finish off.
Después de este tutorial, juega con los nudos y distancias que quieras. Con esta base podrás entretenerte, crear nuevos proyectos y hacer hermosos regalos para tu casa y la de tu familia y amigos.
• • •
After this tutorial, play with different types of knots and distances as you like. You could even have some fun with the base. Create new projects and make pleasing presents for your home your family or friends.
Espero que les haya gustado! Y recuerden seguirme en Instagram para ver todo mi trabajo
Carla
• • •
I hope you liked it! And remember to follow me on Instagram to see all my work
Carla


