UN ALTRE MOLINET: TUTORIAL PATCHWORK.
Dia a dia, Les Antònies, ens anem trobant amb blocs de molinets diferents. El d’aquesta setmana és un molt fàcil i divertit de fer. Nosaltres hem volgut donar-li un cert aire japonès, però es ideal per fer amb teles d’estampats i colors molt vius i alegres.
Comencem el tutorialdonant-vos les mesures i quantitats, encara que les trobareu a l’annex. Nosaltres hem fet servir tres teixits: els del bloc, pròpiament dit, en dues teles en blanc i negre, amb el mateix estampat, però amb efecte negatiu/positiu. D’aquestes necessitem 2 quadrats de cada de 12X12cm. Per rematar el blochem fet servir tires en un estampat de flors, molt pictòric, que no te res a veure amb les centrals, per contrastar al màxim. Us aconsellem que talleu les tires amb el bloc fet i que ajusteu la mesura de llarg; més o menys necessitareu 50cmX3cm d’ample (1).
Abans de cosir res, hem de tallar. Col·loquem els quatre quadrats, un damunt de l’altre, tots en la mateixa direcció (2). Si ho podeu fer amb tots junts, talleu, amb un tall esbiaixat, al centre (3); si al contrari, no ho podeu fer amb totes les teles juntes, dibuixeu amb llapis el mateix tall a tots els quadrats i retalleu: us han de quedar tots igual de desiguals (4). Amb això fet, repartiu les parelles com us mostrem (5).
Ja podem començar a cosir. Fixeu-vos com hem de col·locar la tela: a de coincidir la banda, encara que ens sembli que queda esbiaixat (6). Hem d’obtenir 4 rectangles bicolors (7). Els distribuïu com veieu al dibuix (8). Com podeu comprovar, al no ser quadrats, ens queden descompensats. Nosaltres hem optat per retallar una vegada els hem cosit. Ens interessa que quedi ben encaixat al centre, per això els cosim ajustant les peces al mig. Cosim les peces per tires (9) i obtenim dues L (10) que unim, fixant-nos molt bé per que quedin ben centrades (11). Ara ja podem retallar el sobrant (12) i quadrant molt bé (13).
Ara procedirem a emmarcar el bloc. Situem les tires (14) i les cosim com si fos un Log Cabin (15), en espiral.
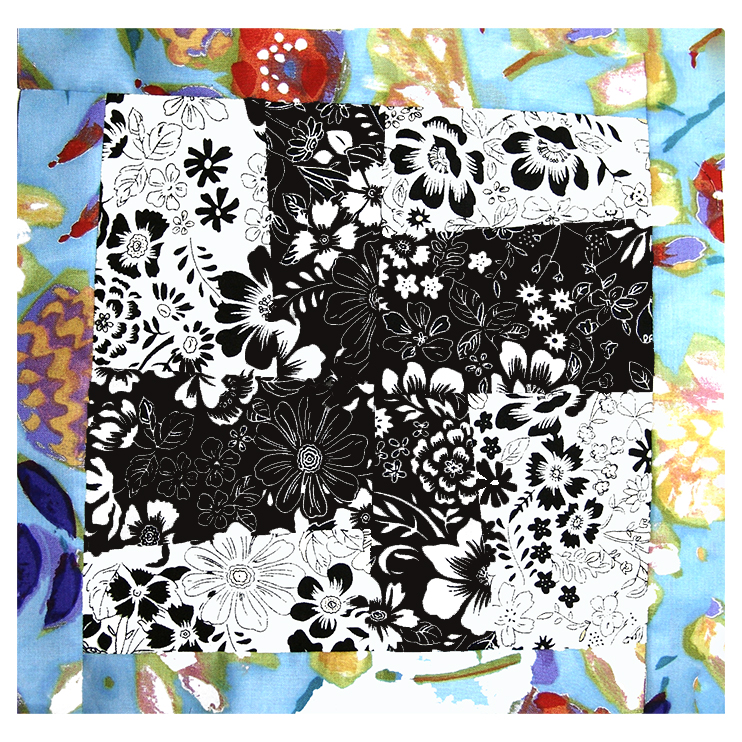
Bloc acabat. Ja veieu, en l’annex amb les mesures i quantitats, com queda acabat i també us donem l’opció de combinar quatre blocs, fent el negatiu/positiu del bloc.
Esperem que us hagi agradat aquesta nova versió del molinet i us llanceu a provar aquesta tècnica.

ELS MOLINETS SÓN PER L’ESTIU!!!
OTRO MOLINILLO: TUTORIAL PATCHWORK.
Día a día, Les Antònies, nos estamos encontrando con bloquesde molinillos diferentes. El de esta semana es un muy fácil y divertido de hacer. Nosotras hemos querido darle un cierto aire japonés, pero es ideal para hacer con telas estampadas y colores muy brillantes y alegres.
Empezamos el tutorial dándoos las medidas y cantidades, aunque las encontraréis en el anexo. Nosotras hemos usado tres tejidos: los del bloque, propiamente dicho, en dos telas en blanco y negro, con el mismo estampado, pero con efecto negativo/positivo. De estas necesitamos 2 cuadrados de cada de 12X12cm. Para rematar el bloque hemos usado tiras en un estampado de flores, muy pictórico, que no tiene nada que ver con las centrales, para contrastar al máximo. Os aconsejamos que cortéis las tiras con el bloque hecho y que ajustéis la medida de largo; más o menos necesitaréis 50cmX3cm de ancho (1).
Antes de coser, tenemos que cortar. Colocamos los cuatro cuadrados, un sobre el otro, todos en la misma dirección (2). Si lo podéis hacer con todos juntos, cortad, con un corte al bies, en el centro (3); si al contrario, no lo podéis hacer con todas las telas juntas, dibujad con lápiz el mismo corte a todos los cuadrados y recortad: os han de quedar todos igual de desiguales (4). Con esto hecho, repartid las parejas como os mostramos (5).
Ya podemos empezar a coser. Fijaos como hemos de colocar la tela: a de coincidir el lado, aunque nos parezca que queda desviado (6). Tenemos que obtener 4 rectángulos bicolores (7). Los distribuís como veis en el dibujo (8). Como podéis comprobar, al no ser cuadrados, nos queden descompensados. Nosotras hemos optado por recortar una vez los hemos cosido. Nos interesa que quede bien encajado al centro, por esto los cosemos ajustando las piezas en el medio. Cosemos las piezas por tiras (9) y obtenemos dos L (10) que unimos, fijándonos muy bien para que queden bien centradas (11). Ahora ya podemos recortar el sobrante (12) y cuadrando muy bien (13).
Ahora procederemos a enmarcar el bloque. Situamos las tiras (14) y las cosemos como si fuera un Log Cabin (15), en espiral.
Bloque acabado. Ya veis, en el anexo con las medidas y cantidades, como queda acabado y también os damos la opción de combinar cuatro bloques, haciendo el negativo/positivo del bloque.
Esperamos que os haya gustado esta nueva versión del molinilloy os lancéis a probar esta técnica.

¡¡¡LOS MOLINILLOS SON PARA EL VERANO!!!
ANOTHER PINWHEEL: PATCHWORK TUTORIAL.
Day by day, Les Antònies, we»re finding with blocksof different pinwheels. This week is a very easy and fun to do. We wanted to give it a certain Japanese air, but it is ideal to do with patterned fabrics and colours very bright and cheerful.
We start the tutorial giving you the sizes and quantities, although you will find in the annex. We used three fabrics: the blockitself, in two fabrics in black and white, with the same print, but with positive/negative effect. Of these we need 2 squares of each of 12X12cm. For finishing block we used strips in a flower print, very painterly, which does not have anything to do with the others, by contrast to the fullest. We recommend you cut the strips with the block finished and adjust measuring long; more or less you will need to 50cmX3cm wide (1).
Before sewing anything, we need to cut. Place the four squares, one on top of the other, all in the same direction (2). If you can do this with all together, cut, with a biased, in the centre (3); If on the contrary, you can’t do with all the fabrics together, draw with pencil the same way in all the squares and cut: we need to keep all the same unequal (4). With this fact, allocate couples as we show you (5).
We can already begin to sew. Note how we have to place the cloth: to match the hand, although it seems that it is biased (6). We have to get 4 two-tone rectangles (7). You distribute them as you see in the drawing (8). As you can see, because they are not being square, they are unbalance. We have opted to cut back once we have sewn. We are interested in that are well positioned in the centre, that»s why sew by adjusting the pieces in the middle. Sew the pieces together by strips (9) and we get two L (10) that join, focusing very well so that they are well centred (11). Now you can trim the excess (12) and fit it very well (13).
Now we are going to frame the block. Placing the strips (14) and sew as if it were a Log Cabin (15), spiralling.
The block is finished. As you can see, in annex with measures and quantities, how it is finished and also we give you the option of combining four blocks, making the negative/positive block.
We hope that you enjoyed this new version of the pinwheeland will be bold to try this technique.
THE PINWHEELS ARE FOR THE SUMMER!!!


