TUTORIAL PATCHWORK: MOLINET A LA JAPONESA.
En aquest post, Les Antònies farem un exercici d’aprofitament total i us compensarem de la complexitat del post anterior. En realitat podria ser la segona part.
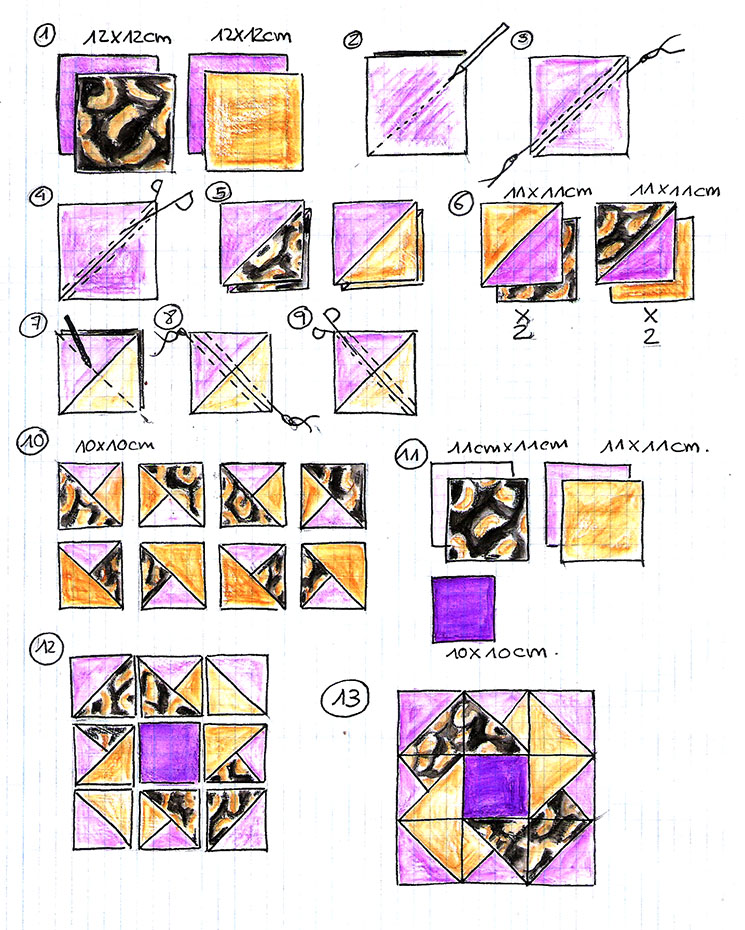
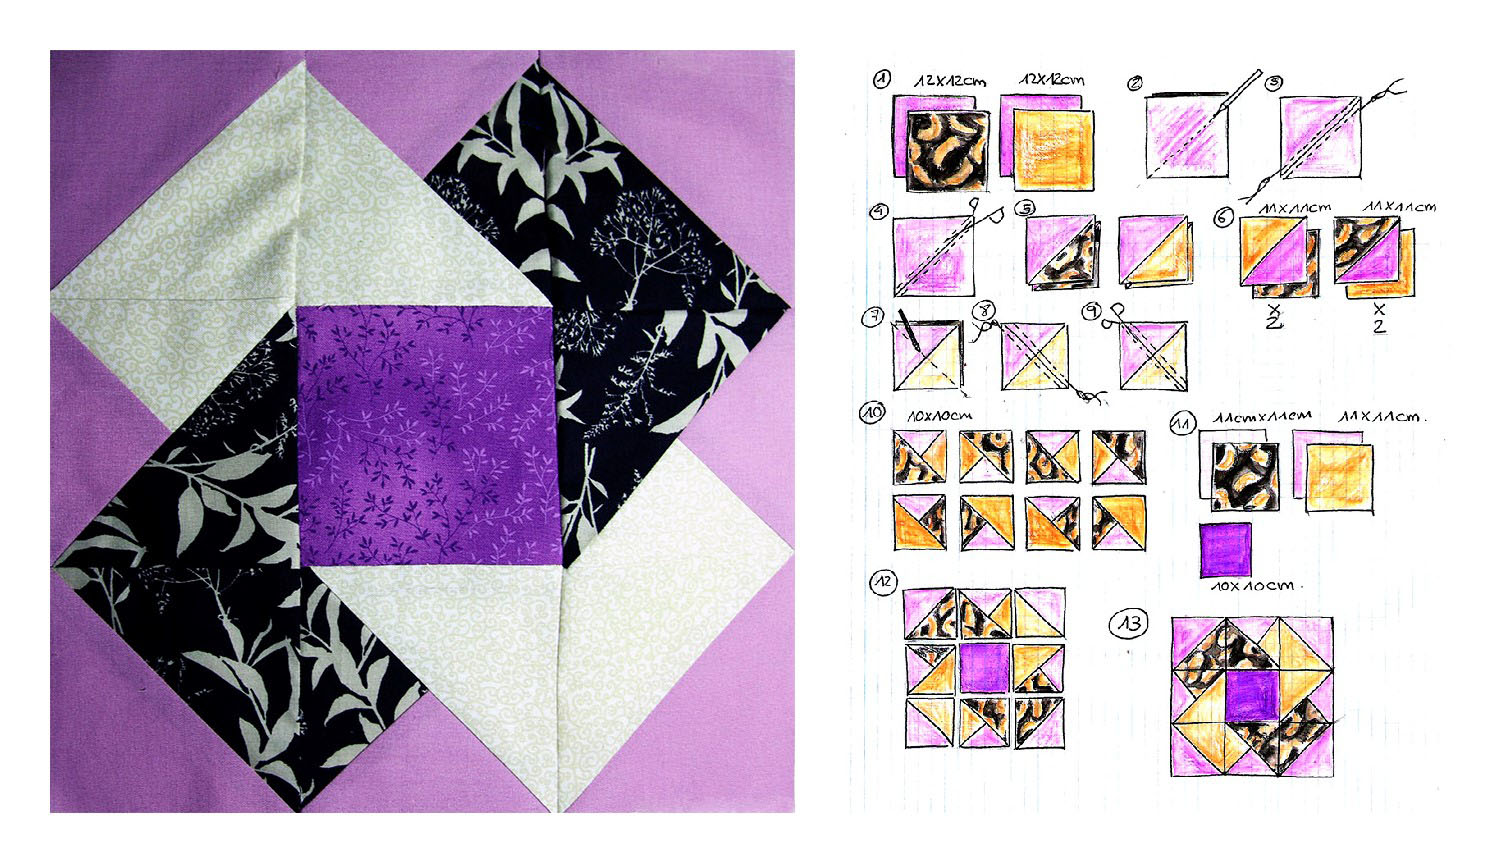
Si mireu l’anterior tutorial de patchwork, veureu que ens varen sobrar quatre quadrats amb triangle, de tres triangles cada un (1). Donant moltes voltes, hem aconseguit un blocque ens agrada molt: un molinetdoble (2).
Hem cosit els quatre quadrats i, com ens quedava una mica ensopit, hem afegit quatre tires al voltant, per donar-li un toc de contrast. Per fer això, hem retallat dues tires en color marró, conservant l’esperit japonès del disseny, de 3’5cm d’ample; la llargada ha de ser la mateixa del mini-bloc(3). Cosim les tires, una a dalt, l’altre a baix (4) i afegim les tires laterals de la mateixa amplada: 3’5cm; però, en aquest cas, a la llargada hem d’afegir les dues tires cosides anteriorment (5). Les cosim (6) i ja tenim el nou bloc fet.
Podeu utilitzar aquest bloccom a complement del de la setmana passada, però també pot ser un bloc únic i fer amb ell qualsevol treball que vulgueu.
Esperem que la idea us hagi fet servei i que també us hagi agradat com a nosaltres.

EL VENT BUFA I FA GIRAR EL MOLINET JAPONÈS!!!
TUTORIAL PATCHWORK: MOLINILLO A LA JAPONESA.
En este post, Les Antònies haremos un ejercicio de aprovechamiento total y os compensaremos de la complejidad del post anterior. En realidad podría ser la segunda parte.
Si miráis el tutorial de patchwork anterior, veréis que nos sobraron cuatro cuadrados con triángulo, de tres triángulos cada uno (1). Dando muchas vueltas, hemos conseguido un bloque que nos gusta mucho: un molinillo doble (2).
Hemos cosido los cuatro cuadrados y, como nos quedaba un poco soso, hemos añadido cuatro tiras alrededor, para darle un toque de contraste. Para hacer esto, hemos recortado dos tiras en color marrón, conservando el espíritu japonés del diseño, de 3’5cm de ancho; el largo ha de ser el mismo del mini-bloque (3). Cosemos las tiras, una arriba, la otra abajo (4) y añadimos las tiras laterales del mismo ancho: 3’5cm; pero, en este caso, al largo hemos de añadir las dos tiras cosidas anteriormente (5). Las cosemos (6) y ya tenemos el nuevo bloque hecho.
Podéis usar este bloque como complemento del de la semana pasada, pero también puede ser un bloqueúnico y hacer con el cualquier trabajo que queráis.
Esperamos que la idea os haya servido y que también os haya gustado como a nosotras.
¡¡¡EL VIENTO SOPLA Y HACE GIRAR EL MOLINILLO JAPONÉS!!!
PATCHWORK TUTORIAL: JAPANESE PINWHEEL.
In this post, Les Antònies will do an exercise in total improvement and we will give back to the complexity of the previous post. This actually can be the second part.
If you look the previous patchwork tutorial, you will see that overran four square with triangle, three triangles each (1). Giving many laps, we’ve got a block that we like a lot: a double pinwheel (2).
We have sewn the four squares and, as it had a little boring, we have added four strips around, to give a touch of contrast. To do this, we cut out two strips in brown, preserving the spirit of japanesedesign, 3’5cm wide; the length must be the same of the mini-block (3). Sew the strips, one above, the other below (4) and add lateral strips of the same width: 3’5cm; but, in this case, to the length we have to add the two strips sewn previously (5). Sewing (6) and we already have the new block.
You can use this block as a complement of the last week, but it can also be a uniqueblock and do with it whatever you want.
We hope that the idea we’ve done and that you enjoyed it as us.
THE WIND BLOWS AND SPINS THE JAPANESE PINWHEEL!!!


